Adhesives & Cements
Plastic cement, CA glue, epoxy, and more — which adhesive to use where, and how to get clean, strong joints every time.
Model Adhesives & Cements: The Complete Guide for Scale Builders
Introduction
Glue doesn’t get the respect it deserves. Modelers will spend hours debating paint brands and spend serious money on aftermarket detail sets — but grab whatever tube of cement is closest and hope for the best. That’s backwards. The adhesive you choose, and how you apply it, has more impact on the final quality of your model than almost anything else in the build process.
Bad glue joints show. They show as visible seams that no amount of putty fully hides. They show as clouded canopies from solvent vapor. They show as warped fuselage halves from too much cement squeezed into a joint. And they show as parts that pop off six months later because you used the wrong adhesive for the material.
When I came back to modeling, the glue landscape had changed more than I expected. The thick tube cement I grew up with — the stuff that came in every Testors starter set — was still around, but experienced builders had moved on to thin liquid cements that work by capillary action. Cyanoacrylate (CA) glue had gone from exotic to essential. And there were specialized adhesives I’d never heard of: canopy glue, white glue for clear parts, and PVA formulations designed specifically for photo-etch.
This guide covers every adhesive type you’ll encounter building plastic aircraft kits, with honest assessments of when each one works best — and when it’ll ruin your build.
How Plastic Cement Actually Works
Before diving into specific products, it helps to understand the fundamental difference between plastic cement and every other adhesive.
Plastic cement is not glue. It’s a solvent.
When you apply plastic cement to polystyrene (the material 99% of model kits are molded from), the solvent dissolves a thin layer of the plastic surface. Press two dissolved surfaces together, and the plastic molecules intermingle. As the solvent evaporates, those intermingled molecules harden into a single piece. You haven’t stuck two parts together — you’ve chemically welded them into one part.
This is why plastic cement only works on polystyrene. It won’t bond resin, metal, wood, or clear styrene (which is a different formulation). And it’s why the bond, when done right, is actually stronger than the surrounding plastic — the welded joint won’t break at the seam, the plastic around it will break first.
Understanding this chemistry explains almost everything about cement technique:
- Thin cement works better than thick because you need just enough solvent to melt the surfaces, not a pool of goo that takes forever to cure and leaves excess material in the joint.
- Parts need to fit well because the cement isn’t filling gaps — it’s melting surfaces together. If there’s a gap, the cement has nothing to weld.
- You can’t rush it because the solvent needs time to evaporate. Open the joint too early and the still-soft plastic deforms.
- Cleanup is about prevention, not correction because spilled cement literally melts plastic. You can’t wipe it off — the damage is already done.
Types of Adhesive
Tube Cement (Traditional Thick Cement)
The classic model glue — a thick, viscous paste that comes in a squeezable tube with a fine applicator nozzle. Brands like Testors, Revell, and Humbrol have sold these for decades. The paste contains polystyrene dissolved in solvent, so when you apply it, you’re adding both a solvent (to melt the joint surfaces) and extra plastic (to fill minor gaps).
Pros: Forgiving for beginners. The thick consistency gives you working time to position parts. The dissolved plastic filler helps bridge small gaps. Easy to control — squeeze a little, apply with the nozzle tip.
Cons: Slow drying (hours to fully cure). Easy to apply too much, which oozes from joints and damages surrounding detail. The thick formula can leave visible “weld marks” if it contacts finished surfaces. Strings and drips.
Best for: Beginners on their first kit. Joints that need some gap-filling. Large structural bonds (wing roots, fuselage halves) where you need working time to align parts.
When to avoid: Clear parts — the solvent vapor will fog canopies. Any joint where squeeze-out would damage detail. Situations where you need a fast, clean bond.
Key products:
- Testors 3501 — The tube that’s been in hobby shops since forever. Works, but most experienced modelers have moved on.
- Revell Contacta Professional — A step up from basic tube cement with a finer applicator.
- Tamiya Cement (white cap, 87003) — Tamiya’s standard-viscosity cement. Thicker than their Extra Thin but thinner than tube cement. A good middle ground.
Liquid Cement (Extra Thin)
This is what most experienced modelers use for 90% of their builds. Extra thin liquid cement is almost pure solvent with very little dissolved plastic. It’s water-thin and works by capillary action: you hold two parts together, touch the brush tip to the seam, and the liquid wicks into the joint by itself. The solvent melts both surfaces, they bond, done.
Pros: Extremely clean joints with zero squeeze-out when used correctly. Fast working — bonds form in seconds, parts are handleable in minutes. The capillary action means the cement goes exactly where the joint is. Leaves no residue on surrounding surfaces.
Cons: Requires parts to fit well — there’s almost no gap-filling ability. Unforgiving of errors — once the solvent melts the plastic, you can’t undo it. Evaporates quickly from the bottle if left open. The brush applicator takes practice to control.
Best for: Almost everything. Fuselage halves, wing assemblies, small parts, any joint where parts fit together cleanly. This should be your primary cement.
When to avoid: Joints with significant gaps (use thick cement or putty instead). Clear parts (use dedicated canopy glue). Parts that need extended positioning time.
Key products:
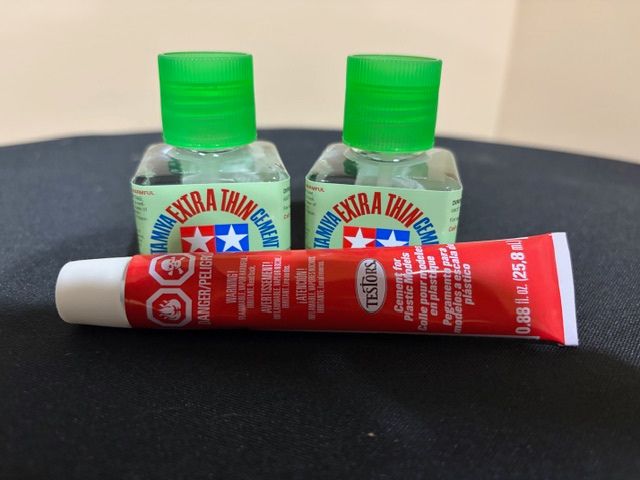
- Tamiya Extra Thin Cement (green cap, 87038) — The gold standard. Ask ten experienced modelers what cement they use and eight will say this. Perfect viscosity, excellent capillary action, fast but not instant cure. The brush applicator is well-designed. Around $5-7 per 40ml bottle. This is the one to buy.
- Tamiya Extra Thin Cement Quick-Setting (blue cap, 87182) — Same formula but faster evaporating. Sets in seconds. Useful for small parts and tacking, but less forgiving than the green cap. Use the green cap until you’re comfortable, then keep both on your bench.
- Mr. Cement S (MC-129) — GSI Creos’s thin cement. Slightly different solvent blend than Tamiya, some modelers prefer the working time. Comparable quality.
- Revell Contacta Professional Mini — Budget option with a fine needle applicator instead of a brush. Good for precise application on small parts.
Cyanoacrylate (CA Glue / Super Glue)
CA glue bonds almost anything to almost anything by polymerizing on contact with moisture (from the air or the surfaces). Unlike plastic cement, CA doesn’t melt plastic — it creates a separate adhesive layer between parts. This makes it essential for materials that cement can’t bond: resin, photo-etch metal, white metal, wood, and mixed-material joints.
Pros: Bonds almost any material. Fast setting (seconds to minutes depending on formulation). Available in thin, medium, and thick viscosities for different applications. Gap-filling ability (thick CA). Strong bonds on non-plastic materials.
Cons: Brittle — CA bonds can snap under stress or vibration. Instant bonding means instant mistakes (and glued fingers). Fogging — CA vapor deposits a white haze on nearby surfaces, especially clear parts. Can’t be repositioned once set. Requires accelerator for some applications.
Best for: Resin parts. Photo-etch. Metal landing gear. Any joint between dissimilar materials. Tacking parts for test-fitting (thin CA). Gap filling where putty isn’t practical (thick CA + accelerator).
When to avoid: Clear parts (fogging risk). Large plastic-to-plastic joints where cement would create a stronger chemical weld. Anywhere near a painted surface — CA vapor can damage paint finishes.
Key products:
- Bob Smith Industries (BSI) IC-2000 — The hobby standard. Available in thin (IC-2000), medium (Super Gold+), and thick formulations. Good quality, widely available.
- Loctite Super Glue Gel — Hardware store option that works well for gap-filling. The gel formula doesn’t run.
- BSI Insta-Set Accelerator — Spray or brush-on activator that cures CA instantly. Essential for gap-filling with thick CA — apply CA, spray accelerator, instant hard fill.
- CA Debonder — Dissolves cured CA. Keep a bottle on hand for mistakes and finger emergencies.
Canopy Glue / White Glue (PVA)
Clear parts are the most nerve-wracking part of any aircraft build. One drop of regular cement and your canopy is fogged forever. Canopy glue solves this — it’s a water-based PVA (polyvinyl acetate) formula that dries clear, produces no solvent vapor, and can be cleaned up with a damp cloth before it sets.
Pros: Zero fogging risk. Dries completely clear. Repositionable before curing. Easy cleanup with water. Safe on painted and clear surfaces.
Cons: Weak bond compared to cement or CA. Very slow drying (hours). Not structural — it’s holding parts in place, not welding them. Can leave a visible glue line if applied too thickly.
Best for: Canopies and windscreens. Clear navigation lights and landing light covers. Any situation where a clear part contacts a painted surface. Some modelers also use it for attaching small photo-etch parts where CA fogging is a concern.
When to avoid: Structural joints. Anything load-bearing. Exterior parts that might experience handling stress.
Key products:
- Micro Kristal Klear — The classic choice. Doubles as a material for making thin windows and clear lenses from a film of glue stretched across a frame. Multi-purpose and reliable.
- Canopy Glue (various brands) — Humbrol, Pacer, and others make dedicated canopy adhesives. All PVA-based, all work similarly.
- Elmer’s Clear Glue — In a pinch, clear PVA from the craft aisle works fine. It’s essentially the same chemistry.
Epoxy
Two-part epoxy (resin + hardener) creates an extremely strong, rigid bond that works on virtually any material. It’s overkill for most model building, but indispensable for specific applications where strength matters.
Pros: Extremely strong. Bonds any material. Gap-filling. Chemical and heat resistant once cured. Won’t attack plastics.
Best for: Heavy metal parts (large resin or white metal pieces). Load-bearing joints that need to survive handling — landing gear on large models, display stand attachment points. Bonding models to bases.
When to avoid: Almost everything else. Epoxy is messy, slow, and requires mixing. For routine plastic assembly, cement is faster, cleaner, and stronger on polystyrene.
Key products:
- 5-Minute Epoxy (various brands) — BSI, Devcon, or JB Weld all make quick-set epoxy. The 5-minute working time is usually enough for model applications.
Which Adhesive for Which Job
Here’s the decision tree for every common modeling situation:
| Situation | Best Adhesive | Why |
|---|---|---|
| Plastic to plastic (good fit) | Tamiya Extra Thin | Capillary action, clean weld |
| Plastic to plastic (gaps) | Tamiya white cap or thick CA + accelerator | Gap-filling ability |
| Fuselage halves | Tamiya Extra Thin | Clean seam for sanding |
| Small parts | Tamiya Extra Thin Quick-Setting | Fast tack, precise |
| Canopy / clear parts | Canopy glue (PVA) | No fogging, dries clear |
| Photo-etch to plastic | Thin CA | Bonds metal to plastic |
| Resin parts | Medium CA | Cement doesn’t work on resin |
| Metal landing gear | Thick CA or 5-min epoxy | Strength on metal |
| Decal sealing (edges) | Micro Sol / Micro Set | Not an adhesive — but often confused for one |
Technique: Using Extra Thin Cement
Since Tamiya Extra Thin is the adhesive you’ll use most, here’s the correct technique:
Basic Joint (Fuselage Halves, Wing Parts)
-
Dry-fit first. Always. Hold the parts together without cement and check the fit. If there are significant gaps, address them before cementing — scraping, sanding, or shimming as needed.
-
Hold the parts together. Use your fingers, rubber bands, or tape to hold the parts in their final position with surfaces touching.
-
Touch the brush to the seam. Dip the brush in the bottle, then touch it to the joint line. Watch — the liquid will wick into the joint instantly via capillary action. You’ll see it darken the seam as it flows.
-
Run the brush along the entire seam. Apply along the full length of the joint, not just one spot. The cement needs to reach the entire bond surface.
-
Hold for 30-60 seconds. The initial bond forms quickly, but keep pressure on while the solvent does its work.
-
Wait before handling. Parts are handleable in 5-10 minutes, but full strength takes 2-4 hours. Don’t sand or stress the joint until it’s fully cured.
Small Parts
For small parts, you can reverse the process: apply a tiny amount of cement to one surface with the brush, then immediately press the part into position. The cement evaporates fast, so work quickly.
Problem Solving
Parts won’t stay aligned: Use masking tape as a hinge. Tape one side, fold the parts open like a book, apply cement, then close and hold.
Too much cement applied: Don’t touch it. Don’t try to wipe it. The plastic is already softened, and touching it will leave fingerprints or tool marks. Let it dry completely (24 hours), then carefully sand the damage.
Joint isn’t strong enough: Apply more cement along the seam from the inside if accessible. Or reinforce with a strip of plastic card cemented across the joint on the interior surface.
Seam still visible after cementing: This is normal — very few joints are invisible without finishing work. Sand with progressively finer grits (400 → 600 → 800), then polish or prime to check for remaining flaws.
Technique: Working with CA Glue
Resin and Photo-Etch
-
Clean the surfaces. Resin parts have mold release agent; wash with warm soapy water first. Sand the bonding surface lightly for better adhesion.
-
Apply a tiny amount. CA is much stronger than you think — a single small drop is enough for most model-scale joints. Too much means squeeze-out and fogging.
-
Position immediately. Thin CA sets in 5-10 seconds. You don’t have time to adjust.
-
Use accelerator sparingly. A quick spritz from 6 inches away. Too much accelerator can cause the CA to cure with a white, crystalline appearance.
Gap Filling with Thick CA
- Apply thick CA into the gap.
- Immediately spray with accelerator — the CA hardens on contact.
- Sand flush once cured.
- Repeat if needed — thick CA is easier to sand than most putties and bonds simultaneously.
Technique: Clear Part Assembly
Clear parts require special care because polystyrene canopies are extremely vulnerable to solvent damage:
-
Never use plastic cement on clear parts. Even the vapor from an open bottle of Tamiya Extra Thin can fog a canopy sitting nearby on your bench.
-
Apply canopy glue to the frame, not the clear part. Use a toothpick to place small dots of PVA along the canopy rail.
-
Position the canopy and hold. PVA takes 30-60 minutes to set, so you have plenty of working time.
-
Clean up immediately. Any visible squeeze-out can be wiped with a damp cotton swab before the glue dries.
-
Consider the Future Flat Coat. Mask the canopy before applying any spray finishes — even water-based acrylics can affect clear parts if pooled at edges.
Storage and Safety
Shelf Life
- Tube cement: 2-3 years sealed. Once opened, the nozzle will clog — keep a pin in it.
- Thin cement: 1-2 years. The solvent slowly evaporates even through closed bottles. Replace when it gets sluggish.
- CA glue: 6-12 months once opened. Store in the refrigerator (sealed in a bag) to extend life. Unopened bottles last 2+ years.
- PVA/canopy glue: 2+ years. Very stable.
Safety
- Ventilation is essential for all solvent-based cements. The fumes are not as dangerous as lacquer thinners, but prolonged exposure in an enclosed space causes headaches and irritation.
- CA glue bonds skin instantly. Keep debonder and acetone (nail polish remover) nearby. If you glue your fingers together, don’t pull — the skin will tear. Apply debonder and gently roll the bond apart.
- Keep all adhesives away from eyes. CA fumes in particular can irritate eyes and cause temporary tearing.
- Never heat cement or CA to speed curing. The fumes become much more concentrated and the risk of fire increases.
Recommended Adhesive Kit
If you’re building plastic WWII aircraft kits, here’s what to keep on your bench:
| Product | Purpose | Priority |
|---|---|---|
| Tamiya Extra Thin (green cap) | Primary cement — 90% of all joints | Essential |
| Tamiya Cement (white cap) | Gap-filling and slower joints | Recommended |
| Thin CA (BSI or similar) | Resin, photo-etch, mixed materials | Essential |
| Thick CA + accelerator | Gap filling, structural repairs | Recommended |
| Canopy glue / PVA | Clear parts | Essential |
| CA debonder | Mistakes and finger rescue | Keep on hand |
That’s six bottles covering every adhesive situation you’ll encounter. Total cost: around $30-40. Buy the Tamiya Extra Thin first — it’s the one you’ll reach for on every build.
The right adhesive in the right amount at the right time — that’s the entire secret. Every excess drop of cement is a potential problem: a fogged canopy, a filled panel line, a warped surface, a fingerprint in softened plastic. Less is almost always more. Master that habit and your builds will improve more than any other single technique change.
Browse WWII Aircraft → | Paints & Painting → | Tools & Equipment →